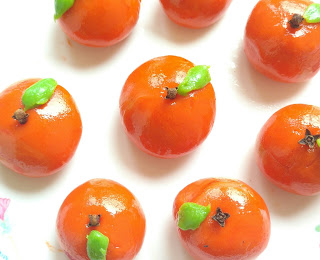
Milkmaid Mithai Recipe | How to make Orange Fruit Shape Mithai

                         
Hello friends, dessert is a must after your delicious meal but if it is made by you and that too in some innovative shapes, who would not like to have that. I am always fond of those sweets (mithai) which are colorful and in beautiful designs. Why not I tell you how to create one. 

I made this orange shape milkmaid mithai with just handful of ingredients . They are perfect for any festivals and kids birthday celebration. Let's know what all you need...


PREPARATION TIME : 20 minutes

COOKING TIME - 10 minutes

SERVES : 4


INGREDIENTS : 

1. Condensed milk ( Milkmaid) --  400 ml

2. Milk powder -- 2 to 3 cups

3. Orange food color -- 1/4 tspn

4. Green food color -- 1/4 tspn

5. Ghee -- 1 tspn


STEPS : 

1. Heat a pan or kadhai and pour the condensed milk in it and keep on stirring.

2. Add the milk powder in it and keep on stirring so that no lumps are formed.

3. You will see the mixture get more and more thickened and it changes color from white to light brown.

4. Switch off the flame. Divide the mixture into two "unequal" halves. 

5. In the larger part, add the orange color and mix properly otherwise it becomes bit difficult to mix when it is cold.

6. In the smaller portion of the mixture, add the green color , mix properly and allow it to cool.

7. Now, when the mixture has cooled down, grease your palms with ghee. Take a small amount of the orange mixture and roll it in the shape of  a ladoo (form a ball shape)

8. Repeat the same process with the all the orange mixture .

9. Now take a very small portion of the green dough to make the leaves. The dough will be sticky so you can easily give the shape of rhombus to the leaf and it will be done.

10. Take the lwangs and pierce it in the middle of the the ladoos (balls) and next to it adjust the leaf. 

11. It easily sticks to the way you want and then place them in refrigerator for about 2 hours.

12. Your milkmaid mithai is ready to serve.


Not only the kids but everyone will be delighted to see the cute sweets and they are perfect for birthday parties and festive seasons. 

I hope you like the milkmaid mithai. Definitely give it a try and let me know in the comment section below. Do not forget to subscribe my blog. 

Himalaya Tan Removal Orange Face Wash | Review

                             
Hi everyone, Himalaya has recently launched it's tan removal kit which includes a face wash, a face scrub and a peel off mask. In this post, I will be sharing my experience of using Himalaya Tan Removal Orange Face Wash. 

So as per it claims, does it really works on tan ? If it is so, then this product from Himalaya will be a favorite for everyone especially for summers. Without much delay, moving on to its review....

PRICE : ₹130 for 100 ml

SHELF LIFE : 2 years

PACKAGING : The face wash comes in a plastic transparent tube with a flip flop cap. 

COLOR : As its main ingredient is orange, the face wash is too orange in color. 


FRAGRANCE : Ahh.... It smells like the orange candy and you will feel like eating it. 😂😂


WHAT THE PRODUCT CLAIMS : 


It is an effective blend of orange peel, honey and papain which visibly reduces skin tan and smoothes skin by gently removing dead skin cells. The gentle exfoliating nature of Papain helps removes tan, whereas Orange Peel improves skin tone. Honey soothes and moisture.


WHAT I LIKED ABOUT IT : 👍👍

🔷 Its fragrance is mind blowing and you will love while washing your face with it.

🔷 The face wash is a gel based formula and cleanses the face in one wash very easily.

🔷 The price is in your budget and I guess this is a big plus point in any Himalaya product. You can easily try out any product from this range without thinking about the cost.

🔷 It not at all dries out your face. After returning from work, I simply wash my face with this and always forget to apply something as you don't need anything.

🔷 The ingredients combination is superb and suitable for all skin tones. I have tried this in summers and feel it will work well in winters too.


🔷 It brings an instant shine on your face. 


WHAT I DONT LIKED ABOUT IT 👎👎

🔻 The tan is not removed as it claims which led bit of disappointment. I hope it may work after prolonged usage.

🔻 The consistency is same as that of the Himalaya Neem face wash, only difference is the color and fragrance. Himalaya could have done a change in its consistency.

🔻 The packaging is also very similar to the previous Himalaya face washes.

🔻 I was expecting the orange peel extracts in it which they claimed but could find any.


MY RATING : ⭐⭐⭐🌠


OVERALL VERDICT : I  would recommend you to buy this face wash from Himalaya as it is very light both on your face and pockets. If you like gel based face wash and use one to cleanse Your face instantly, this will never disappoint you. Yes, don't expect too much like tan removal in one wash or in one week. It may take more time than this.

Yes , I can say that the tan removal part will work more if used with its tan removal scrub and peel off mask. 

Aroma treasures Aloe Vera Gel Review

                           
Aloe vera is a multipurpose natural product and I must say it is a boon for the summers. Not matter you have oily skin or dry or combination skin, it works perfect for each one of them. There are various brands which have launched their Aloe vera gel .

The difference between them and the original one is that the ones available in the stores do have some other ingredients for your skin type. So you cannot completely say that anyone is good for your skin.

I have tried the aloe vera gel from Aroma treasures and it is very different product. Let's know about it more....


PRICE : ₹321 for 500 grams. There is a small pack also available . You can try your hands on that pack when it's your first time.

SHELF LIFE : 2 years

PACKAGING : It comes in a big round transparent plastic container with flat base. The quantity of the gel is clearly visible. 


COLOR : The color of the gel is beautiful grass green.


FRAGRANCE : Now coming to its part which I hate most. It has a peculiar smell. Initially I didn't like it and thought how will I use it. But thank God! It vanishes after you apply it.


WHAT THE PRODUCT CLAIMS


This Aloe vera is suitable for all skin types , body and hair. Highly recommended for following uses :

FACE  : Acne scars, pimples, before makeup, dry and chapped skin, razor cuts, after shaving, ageing.

HAIR : Scalp disorder, improves hair quality, styling, prevents dandruff.


DIRECTIONS FOR USE : Apply to face, hair and skin. Use 2-3 times a day for better results.

MY EXPERIENCE

  • When you will apply it , it get absorbed easily and you will not feel heavy on your skin. 😊👍

  • In winters, it dries up the skin. Mine one is oily and my skin too get dry if applied this gel in winters. So I can say not good for any skin type in winters. 😢👎

  • In summers, oily and normal skin beauties can definitely try this one out but not dry skin beauties.👍👎

  • It brings a shine on your skin and very good as a makeup primer.👍😊

  • It does not smells that good that you will fall for it but it vanishes as soon as it's applied. 😢👎

  • It is paraben free and enriched with essential oils. 😊👍


MY RATING : ⭐⭐⭐

OVERALL VERDICT : Well, I liked the aloe vera gel but will recommend to only oily skin and normal skin types. Those with the dry skin, do not try this one. I feel aloe vera gel should be such that it can be used in every season but the ones available in the market as some other ingredients as well which makes your skin dry or oily after application.

Apart from face, for hair and skin purposes, it is very good, definitely a try. I used this Aloe vera gel with coconut oil to reduce my dandruff issues. 


Thanks for visiting my blog. Do not forget to subscribe my blog to get the updates in your mail. You can easily follow my blog on other social networking sites.

Facebook : Bornbeautifull beauty blog
Instagram : bornbeautifull_blog
Roposo : Bornbeautifull


The Face Shop Blueberry Sheet Mask | Review

                             
The Face Shop is a Korean brand and has launched it's sheet masks in India. These sheet masks are with goodness of various organic products and available for all skin type range. One can easily choose the sheet masks according to the main ingredient labelled on the pack. 

Recently, I got my hands to this Blueberry Bleuet sheet mask and I have oily skin. But is it worth it? Is it good for the other skin types or not, let us know its review.

PRICE : ₹100 per sheet mask

PACKAGING : The sheet is completely dipped in serum and folded in the waterproof paper packing. The picture of the main ingredient is clearly given on the front side. On its back side, instructions are given how to use it and how it is beneficial.


SHELF LIFE : Not mentioned


WHAT THE PRODUCT CLAIMS : 


The mask sheet with Blueberry essence replenishes skin's moisture barrier to protect it's energy and vitality and help create baby soft skin. (Drenched with emulsified moisturizing serum/ Formula without added parabens).

DIRECTIONS FOR USE : 

1. Wash face and apply toner.

2. Pull out mask and carefully place on face. 


3. Remove after 10 to 15 minutes and pat face lightly to absorb remaining essence into skin.

This way the sheet mask is folded and drenched in serum inside the pack.

The sheet mask looks like this. This is a dry one as the wet one was bit difficult to get clicked 😢

WHAT I LIKED ABOUT IT : 👍

  • It is very easy to carry and to apply as well. You just have to cut the pack, take out the sheet mask, unfold it and apply it on your face. 

  • The serum is sufficient in it. Apart from those fully absorbed in the mask, you can easily see the serum in the pack. So you can also apply it on your neck area.

  • The serum is neither too thick nor too runny in consistency which makes every season suitable for its application.

  • It smells very soothing with a light fragrance in it.

  • It makes your skin super soft and shinning. Though this effect lasts for only 2 days.

  • It evens out your skin texture and you will be able to feel it.

  • It does not contain parabens.

WHAT I DONT LIKE ABOUT IT 👎

  • It is written on the pack to keep it for 15 minutes but trust me, it does not work within this span of time. You need to keep it for 1 to 2 hours. That's why I prefer to use it at bedtime.

  • Once a while it's application does not bring much change to your skin. You need to apply it thrice a week.

  • It does not do anything for fairness purpose as we expect from serums but yes, it's a good boost for your skin.

  • The pack does not mention the skin types which is a must have for any beauty product. As such, it really becomes difficult to choose by yourself which will suit your skin and which will not.

MY RATING : ⭐⭐⭐🌠

OVERALL VERDICT : Well, I was very excited to use this sheet mask but it does not stand true as I expected. I thought it must be something different than the other face masks as it contains serum.

I really appreciate the glow it brings to the skin and for that I love it and I would recommend you for this purpose. If your skin has lost that moisture and smoothness, you definitely should try this.

This Blueberry mask was good one and I think it is suitable for all skin types, mine is oily. It worked well on my oily skin means it does not lead to breakouts and pimples so yes, dry and normal skin beauties can try it out without hesitation.

If you like my post, don't forget to like and share it. For any queries, do comment in the comment section below. Do try this sheet mask and let me know your experience.
Don't forget to subscribe my blog to get the updates .


Watermelon Delight Recipe

                             
Summer not only brings us the king of fruits, but also another fruit which we cannot forget. The cool and soothing watermelon. While eating watermelon, only the tough part is to remove it's numerous seeds and thats why ignored by many people. But once you try this watermelon delight , you will go with it again and again.

So make this watermelon delight and make watermelon easy to drink for everyone.


PREPARATION TIME : 10 to 15 minutes

COOKING TIME : No need to cook

SERVES - 2


INGREDIENTS :

1. Watermelon (cubed and seeds removed) - 2 cups 

2. Powdered sugar - 2 tspn

3. Lemon juice - 2 tspn

4. Chaat masala / black salt - a pinch

5. Ice cubes - 2 to 4 


STEPS :

1. Remove the seeds from the watermelon and cut it in cubes. Add into the blender.


2. Add the powdered sugar in the blender. Adding the powdered makes the process easier otherwise the crystal sugar takes time to dissolve and it can make the watermelon juice more runny.


3. Add in the lemon juice and blend it till smooth.

4. Prepare a glass by inverting the glass into powdered sugar so that the sugar sticks to the rim of the glass. 

5. Take a slice of lemon and tug in the rim of the glass. Add the chat masala in the glass. 


6. Pour in the blended watermelon in the glass. Add some ice cubes. Your watermelon delight is ready.


For more recipes, click the link below 👇


Mango Rava Halwa Recipe


Hello friends, summer season is here and no matter this brings a lot of negative factors but how can we forget our king of fruits.. "Mango". Sitting back and just eating mango slices could be boring. So this summer try out different recipes with mango and surprise your family.

Mango rava halwa also known as mango kesari is a South Indian desert. It is very easy to cook same like plain rava (sooji) halwa with a mango flavour in it. Let's know what all you need to prepare it 😊

PREPARATION TIME : 5 minutes 

COOKING TIME : 20 minutes

SERVES : 4

INGREDIENTS 

1. Ripe mangoes - 2 to 3 medium size

2. Elaichi - 3 

3. Kesar(optional) - 4 to 5 strands

4. Sugar - 2 cups

5. Milk - 2 cups

6. Semolina/Rava (sooji) - 3 cups

7. Ghee - 3 tspn

8. Water - 1 cup

9. Almonds(optional) - 5 to 6


STEPS 

1. Take the mango pulp in a jar, add 2 to 3 tspn sugar, crushed elaichi and kesar (optional).


✔Make sure not to take sour mangoes or else it will spoil the taste of halwa.

2. Now add 1 cup milk to this mixture and grind to a fine puree.


✔ Adding milk while preparing the mango puree prevents it from getting too thick. As such, it will easily mix with the rava.


3. Heat ghee in a pan or kadhai and add the sooji and stir till golden brown. Add the dry fruits so that it also gets roasted along with the rawa.


4. Once its done, add the mango puree slowly along the sides and mix it with the rawa.


5. Stir and cook for 5 more minutes and then add rest of the milk and water. Add sugar along with it. 


6. Cook for another 5 minutes and switch off the flame. Serve hot with grated coconut or slices of mango.


🔹You can also refrigerate it and serve it later.

I hope you find the mango rawa halwa easy to make. This summer definitely try this one for your kids, family and friends and let them guess what is the extra element you added in the sooji halwa. 

I will back soon with another summer cool recipe. Till then, follow my blog on all social media to get all the updates. Do not forget to like, comment and share my post. 


Apple Kheer Recipe

                            An apple a day, keeps the doctor away !  Hi friends, I hope you all have listened this popular phrase ...